
How to manage files and links by using the Files panel
The Files panel in Dreamweaver helps you manage files and links. Use the Files panel to open, add, rename, or delete files and folders. Use the Files panel to modify links.
Opening files
Use the Files panel to view and manage the files in your Dreamweaver site. To open a file:
1. In the Files panel (Window > Files), select a site, server, or drive from the Current Sites pop-up menu.
2. In the Local Files section, navigate to the file you want to open.
3. Do one of the following:
• Double-click the files's icon.
• Right-click (Windows) or Control-click (Mac OS) the file's icon, then select Open.
Note: If Check In/Check Out is enabled, Dreamweaver will check the file out before it opens the file. If another visitor has checked out the file, Dreamweaver will warn you about the file’s status and let you know who has it checked out. You can then decide whether to continue opening the file or not.

Renaming files
When you rename a file in the Files panel, Dreamweaver can automatically change links that point to this file. For this reason, it is always preferable to rename site files by using the Files panel instead of renaming them on your hard disk.
To rename a file:
1. In the Files panel, select the file or folder you want to rename.
2. Do one of the following to activate the name of the file or folder:
• Click the name, pause, and then click again.
• Right-click (Windows) or Control-click (Mac OS) the file or folder icon, and then select Edit > Rename.
3. Type the new name over the existing name.
4. Press Enter (Windows) or Return (Mac OS). If any site links point to the file or folder, the Update Files dialog box opens.
5. Click Update to change links that point to the renamed file or to a file in the renamed folder.

Deleting files
When you delete a file or folder, Dreamweaver will warn you if links in other documents point to the file or folder.
To delete a file:
1. Click the file or folder in the Files panel you want to delete.
2. Press Delete. If any site links point to the file or folder, the Delete Files warning opens, giving you the opportunity to change the links before you delete the file.
To delete the file anyway, click Yes. To cancel your request to delete the file, click No.
You can also change links to a file through the Files panel. It is a good practice to change links before you delete a file to which other files are linked.
To change links to a file:
1. Select a file in the Files panel. Select Site > Change Link Sitewide. The Change Link Sitewide dialog box opens.
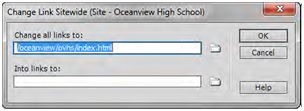
2. In the Into Links To text box, enter the name of the file to which new links should point.
3. Click OK. The Update Files dialog box opens.
4. Click Update.

Creating a new folder
Use folders to keep your site well organized. For example, most websites use a folder named images to store all the images for the site.
To create a new folder:
1. Select the site root folder (or another folder in which you want to create a nested folder).
2. In the Files panel menu, select File > New Folder. Dreamweaver creates a new folder inside the selected folder. The folder name is selected.
3. Enter a name for the new folder and press Enter. (Windows) or Return (Mac OS).

