Unless you run a one-person operation, you’ll likely need to add other users to your Office
365 subscription. When you do, they can use all the programs and features that Office 365
provides.
To add a user to Office 365, sign in to your Office 365 account and open the Admin Center.
Then follow these steps:
1. Click Users and then Active Users in the pane on the left.
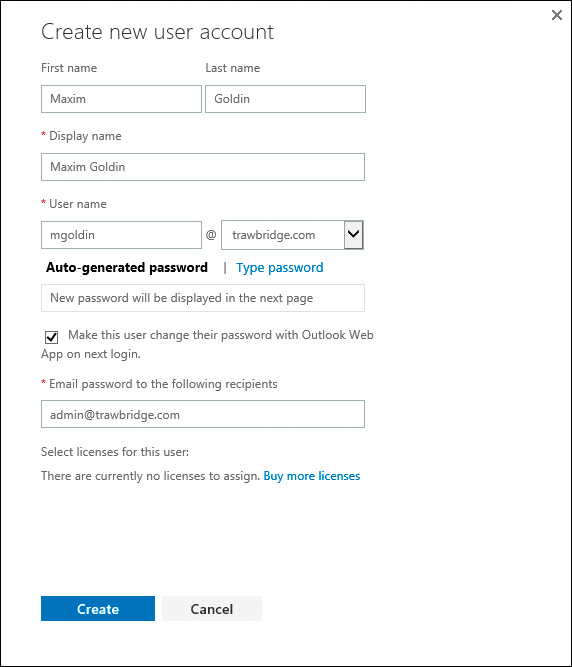
2. Click the Add User button (the plus sign). The Create New User Account page opens.
3. Enter the following information. When you’re finished, click Create.
■ First name This is the user’s first name.
■ Last name This is the user’s last name.
■ Display name When you enter the user’s first and last names, they are automatically concatenated for the display name. If you want to change the display name to
a nickname or some other type of shorthand, go ahead and do it now.
■ User name This is the name your new user will use to sign in to his or her account
when accessing Office 365. Be sure to click your new custom domain in the dropdown list on the right.
■ Password If you leave the default Auto-Generated Password, a random password
will be chosen and emailed to the user. Alternatively, you can set a password for the
user. To do so, click Type Password and enter the password you want to use.
■ Make this user change their password with Outlook Web App on next
login Select this check box if you want the user to change the password the
next time he or she signs in.
■ Email password to the following recipients After you choose a password
option, enter the user’s email address so that the password can be sent to that
user. Also enter your own email address so that you, the administrator, also get
the password, for safekeeping.
4. A confirmation message similar to the one shown in Figure informs you that the
user account has been created. Click Close.
If you prefer, you can add multiple users at the same time.
TIP : Before you begin this process, make sure you have enough licenses for everyone you
want to add. To find out how many subscriptions you have available, click the Billing option
in the left pane of the Admin Center and click Subscriptions. If you need to purchase more
licenses, click the Change License Quantity link and follow the prompts.


